
Filtrul de e-mail Outlook nelucrat - cum funcționează
Filtrul de e-mail necompletat din Outlook recunoaște mailurile de spam și le sortează din căsuța de e-mail în folderul de mesaje nesemnificative. Puteți afla cum funcționează acest lucru și cum puteți configura folderul aici.
Cum funcționează filtrul de e-mail necompletat în Outlook
- Filtrul de e-mail necombustibil nu împiedică primirea de e-mail-uri spam, le mută într-un folder suplimentar și astfel, ca să zic așa, în carantină. Deoarece aceste mesaje pot conține viruși în cel mai rău caz, atașamentele sunt de obicei blocate.
- Filtrul este activat în mod implicit în Outlook. Aceasta este setată la „scăzut”, dar poate fi modificată. Citiți cum se face acest lucru în paragraful următor.
- Mai ales dacă nivelul de securitate este stabilit de la „ridicat”, Outlook poate face evaluări incorecte. Prin urmare, verificați în mod regulat e-mailurile din folderul de e-mail. Dacă un e-mail ar trebui să ajungă în acest dosar din greșeală, puteți glisa și plasa pur și simplu în căsuța de e-mail.
Configurați filtrul de e-mail necompletat în Outlook
Pentru a configura filtrul, trebuie să accesați setările acestuia. Acest lucru se întâmplă în diferite versiuni Outlook în următoarele moduri:
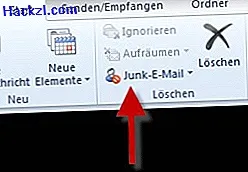
- Outlook 2010 și 2013: deschideți fila „Start” în partea de sus. În grupul „Ștergeți”, selectați elementul „E-mail junk” și faceți clic pe „Opțiuni e-mail junk”
- Outlook 2007 și 2003: Faceți clic pe „Extras” din meniul de mai sus și selectați „Opțiuni”. Acum puteți vedea butonul „Junk E-Mail” în partea de sus.
Setați corect filtrul de e-mail
- Aici puteți comuta înainte și înapoi între filele individuale. Printre altele, orice expeditor poate fi marcat acolo ca sigur sau blocat.
- Puteți seta nivelul de securitate în partea de sus în Opțiuni. Primele patru opțiuni vă permit să dezactivați complet filtrul de e-mail necompletat, setați sensibilitatea pe „Scăzut” sau „Mare” sau (dacă doriți să fiți absolut sigur) primiți doar e-mailuri de la persoanele pe care le aveți deja marcată ca sigură (vezi imaginea).
- În final, faceți clic pe butonul „OK” pentru a aplica modificările.
