
Photoshop: cum să creați flăcări
Vă prezentăm în detaliu cum puteți crea flăcări cu Photoshop în acest manual.
Creați flăcări în Photoshop: Iată cum
- Deschideți o imagine în Photoshop pe care doriți să o aduceți la viață cu flăcări.
- Mai întâi dublați stratul și activați stratul superior. Deschideți fereastra de dialog pentru efecte de iluminare prin meniul "Filtru" și elementul "Filtru de randare". În fereastra de previzualizare, mutați cercul astfel încât centrul să se afle peste fitil.
- Selectați „Spot” ca tip de lumină și un portocaliu strălucitor ca culoare. Setați glisorul de intensitate la 25 și glisorul de focalizare la -100. Puteți utiliza un maro mediu pentru proprietăți. Doar lăsați luciul și expunerea la 0, trageți materialul la 70, împrejurimile la 10. Jucați-vă cu setările până când sunteți mulțumit de rezultat.
- Acum ai nevoie din nou de un nou nivel. Setați culoarea prim-planului la un galben deschis. Folosiți instrumentul de selecție de elipă pentru a desena o elipsă în jurul fitilului. Acum completați selecția cu un gradient de la galben deschis la transparent. Utilizați o radieră moale pentru a elimina zonele pe care nu doriți să le evidențiați. Modificați modul stratului în „Înmulțiți negativ”.
Photoshop: creează flăcări
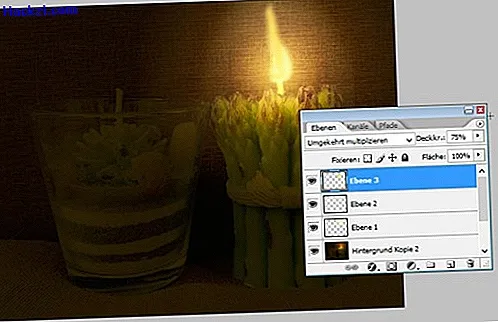
Lumină de foc este gata acum, dar flacăra încă trebuie aprinsă.
- Vopseste o flacără galben deschis pe un nou strat cu instrumentul de perie. Puținele tonuri de portocaliu și roșu fac flacăra realistă.
- Pâlpâirea unei flăcări este creată cu filtrul „Motion Blur” de sub „Filter blur”.
- Lumina tipică a focului încă lipsește. Pentru a crea acest lucru, creați un nou strat și trageți un gradient radial de la o culoare prim-portocalie la transparență peste fitil.
- Schimbați modul strat de la „normal” la „multiplicare negativă” și reduceți ușor opacitatea.
- Repetați pașii trei și patru, doar de data aceasta alege albul ca culoare prim-plan. Ar fi trebuit să fi creat acum o flacără realistă cu o strălucire caldă.
Ultimele videoclipuri
Cu efectele de iluminare obțineți o primă strălucire a focului.

Flacăra arată încă un pic întunecat și lipsește luminozitate.
Obțineți atingerea finală cu instrumentul de nivelare radială.
