
Creați și ștergeți partiții pe stick-uri USB - funcționează asta?
Din păcate, momentan nu este posibil să se creeze mai multe partiții pe stick-uri USB sub Windows. Cu toate acestea, puteți crea o singură partiție relativ ușor. Vă arătăm cum să o faceți.
USB stick: creați partiție - vă rugăm să rețineți:
Atenție: cu instrucțiunile noastre creați o singură partiție pe stick-ul USB. Deși dimensiunea lor poate fi determinată liber, spațiul de stocare neutilizat ulterior nu poate fi atribuit unei noi partiții. Astfel, reduceți artificial dimensiunea stick-ului USB. Acest lucru este util, de exemplu, pentru osciloscopurile vechi care acceptă doar stick-uri USB până la o anumită dimensiune de memorie. Puteți utiliza mai multe partiții doar pe un stick USB cu sisteme Linux.
Partiție cu instrumentul Windows „DiskPart”
De obicei nu este posibilă partiționarea unui stick USB, deoarece Windows îl recunoaște doar ca un disc detașabil. Prin urmare, gestionarea discurilor nu este utilă, deoarece nu se poate efectua mai mult de o formatare acolo. Cu toate acestea, de la XP, există un instrument de linie de comandă integrat în Windows numit „DiskPart”. Aceasta permite compartimentarea.
- Pentru a utiliza „DiskPart”, trebuie să porniți promptul de comandă cu drepturi de administrator. Cu Windows XP acest lucru se întâmplă automat, din Windows Vista faceți clic dreapta pe prompt și selectați „Execută ca administrator”.
- Veți găsi promptul din „Toate programele” -> „Accesorii” din meniul Start Windows.
- Introduceți comanda "discpart" (introduceți toate comenzile fără ghilimele). Acum puteți utiliza diverse comenzi pentru a accesa hard disk-uri și suporturi amovibile și a le partiționa.
1. Obțineți o imagine de ansamblu pentru a găsi stick-ul USB
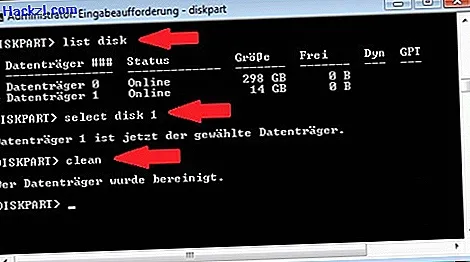
Este recomandabil să utilizați mai întâi comanda „disc de listă” pentru a obține o imagine de ansamblu asupra unităților existente. Dimensiunea stick-ului USB poate fi adesea identificată.

2. Selectați stick USB și ștergeți partiții
După ce ați găsit stick-ul USB, continuați după cum urmează:
- În pasul următor, selectați-l folosind „select disc”. Introduceți numărul de pe stick-ul USB, de exemplu „selectați discul 1” (a se vedea imaginea).
- Sfat: Dacă ați executat comanda de mai sus, puteți utiliza „disc de detaliu” pentru a afla mai multe despre unitatea selectată, astfel încât să puteți evita cu ușurință confuzia cu hard disk-urile, de exemplu.
- Dacă sunteți sigur, puteți utiliza „clean” pentru a șterge partiția existentă pe suportul de date selectat (a se vedea imaginea).
Creați o nouă partiție pe stick-ul USB
Acum creați o nouă partiție:
- Introduceți „creați partiția primară” pentru a crea o nouă partiție primară. Dacă doriți să creați o partiție mai mică, introduceți, de exemplu, „create partition primary size = 4000”. Așa se creează o partiție cu 4000 MB. După cum am menționat în prima secțiune, nu mai puteți utiliza spațiul rămas pe stick-ul USB.
- Apoi selectați noua partiție cu „selectați partiția 1” și introduceți comanda „activ”. Partiția este acum setată ca o partiție de sistem.
- Apoi, trebuie să formatați partiția. Pentru a face acest lucru, introduceți „format fs = fat32 rapid”.
- În cele din urmă, introduceți comenzile „assign” și „exit” una după alta. Stick-ul USB este acum din nou funcțional și va apărea din nou la locul de muncă după puțin timp.
Anulează partiționarea
Dacă doriți să utilizați din nou capacitatea completă a stick-ului USB, trebuie să ștergeți partiția creată și să creați o nouă partiție fără restricții. Pentru a face acest lucru, parcurgeți din nou pașii de mai sus. De data aceasta, însă, nu introduceți o dimensiune.
- După ce ați șters partiția existentă așa cum s-a descris mai sus, introduceți „creați partiția primară”, selectați-o cu „selectați partiția 1” și formatați-o cu „format fs = fat32 rapid”
- Apoi introduceți comenzile „assign” și „exit” una după alta. Acum, întregul spațiu de stocare al stickului dvs. este din nou disponibil.
Acest sfat practic funcționează cu toate versiunile de Windows de la Windows XP. Dacă ulterior aveți probleme cu stick-ul dvs., puteți să îl formatați și cu instrumentele de pe Windows.