
Notebook: înlocuiți ventilatorul - trebuie să luați în considerare acest lucru
În cazul în care notebook-ul dvs. zumzăie și ventilatorul funcționează cu viteză maximă, îl puteți înlocui sau curăța. Cu toate acestea, există anumite lucruri pe care trebuie să le luați în considerare pentru a evita deteriorarea laptopului. Vă prezentăm procedura corectă în acest sfat practic.
DIY - Curățați sau înlocuiți ventilatorul caietului
Pregătirea corectă este importantă pentru a vă asigura că totul funcționează fără probleme.
- Găsiți o suprafață de lucru suficient de dimensionată și curățați-o. Se recomandă să plasați un prosop suplimentar pentru a evita zgârierea spatelui caietului.
- De asemenea, veți avea nevoie de un set de șurubelnițe speciale, deoarece ventilatorul va fi ancorat cu alte șuruburi. Cu mini șurubelnița setată de la Hama (disponibilă pe Amazon pentru aproximativ 12 euro) sunteți echipat pentru aproape toate tipurile de șuruburi.
- În plus, camera trebuie să fie suficient de iluminată pentru a putea recunoaște corect componentele.

Schimbați elementul de ventilație al laptopului
Acum puteți începe. Rețineți că garanția notebook-ului dvs. poate deveni nulă odată ce scoateți capacul. De asemenea, puteți arunca o privire asupra pașilor individuali de mai jos în galeria noastră de poze.
- Desfaceți șuruburile de pe capacul notebook-ului și scoateți bateria.
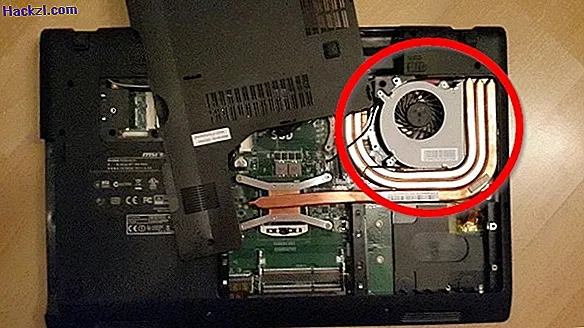
- Apoi uită-te la interiorul laptopului. Pe lângă hard disk și memoria RAM, puteți vedea și ventilatorul, care este adesea conectat la o conductă de căldură.
- Prin urmare, cu unele caiete este necesară scoaterea în prealabil a conductei de căldură. În exemplul nostru, ventilatorul poate fi îndepărtat fără a fi nevoie să deșurubați linia de răcire.
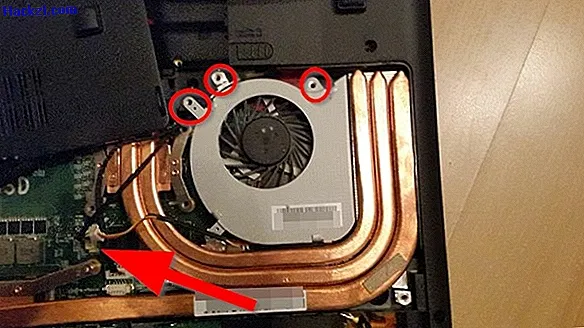
- Acum deconectați cu atenție sursa de alimentare a ventilatorului de la placă (vezi imaginea - săgeată).
- Puteți îndepărta apoi șuruburile ventilatorului și ridicați-l ușor din carcasă.
- Dacă s-a acumulat praf sub ventilator, acum îl puteți îndepărta.
- Acum puteți reintroduce și înșuruba un ventilator nou sau curățat. Nu uitați să porniți din nou ventilatorul.
- În cele din urmă, trebuie doar să înșurubați capacul înapoi pe notebook și să introduceți bateria.

Dacă mai aveți probleme cu supraîncălzirea, puteți utiliza un instrument precum „SpeedFan” pentru a le urmări. În articolul următor, vă vom arăta cum să vă răciți corect computerul și laptopul și să evitați loviturile de căldură.
Ultimele videoclipuri
Găsiți un loc potrivit și pregătiți-vă materialele de lucru.

Acum scoateți bateria notebook-ului.

După îndepărtarea capacului, puteți vedea ventilatorul. Acest lucru este adesea conectat la o conductă de căldură, pe care s-ar putea să fie nevoie să o deșurubați.
Deconectați conectorul ventilatorului de la placă și scoateți șuruburile.
Puteți ridica apoi ventilatorul din notebook și introduceți un element de ventilație nou sau curățat.
