
Nintendo Wii: Instalați canalul homebrew
În acest ghid, vă vom arăta cum să instalați canalul homebrew pe consola de jocuri Nintendo Wii în doar câțiva pași. Toate informațiile din acest manual se referă la actualul firmware 4.3 Wii.
Canal homebrew pentru Wii - ce este?
Cu un canal homebrew, puteți reda proiectele dvs. de software privat pe Wii fără modificări hardware. După ce ați configurat canalul homebrew pe consola de jocuri și ați repornit Wii, veți găsi instrumentul ca element de meniu în meniul principal.
- Puteți dezinstala cu ușurință canalul homebrew în orice moment folosind gestionarea regulată a datelor din setările Wii.
- Vă rugăm să rețineți că canalul homebrew nu este un software oficial de la Nintendo. Instrumentul a fost furnizat de programatori privați. După ce instalați canalul homebrew, riscați ca garanția consolei de jocuri să fie anulată.
Homebrew Channel: Cerințele
Înainte de a instala canalul homebrew pe consola de jocuri, trebuie să faceți mai întâi câteva lucruri:
- Nintendo Wii trebuie să aibă cel mai recent firmware Wii 4.3. Dacă nu este cazul, trebuie să vă actualizați mai întâi consola utilizând setările sistemului.
- Aveți nevoie de o cartelă SD complet goală cu cel puțin unul și maximum două GB spațiu de stocare. Cel mai bine este să formatați cardul SD pe computer înainte.
- Pentru a putea configura canalul homebrew la toate, va trebui ulterior să descărcați și să folosiți pachetul complet „Nintendo Wii 4.3 Letterbomb Channel”.
- Folosiți controlerul oficial Wii. Înlăturați în prealabil atașamentul Wii Motion Plus, deoarece poate provoca probleme ocazional.
Pas cu pas către canalul Wbre homebrew
Urmați instrucțiunile cu atenție pentru a evita posibilele complicații sau deteriorarea software-ului Nintendo Wii. Pașii exacti pot fi găsiți și în galeria noastră de imagini.
- Îndepărtați accesoriile hardware din porturile Wii de care nu aveți nevoie pentru a instala canalul homebrew. Acestea includ, de exemplu, cardul de memorie sau controlerul Gamecube. În plus, asigurați-vă că există o conexiune la internet activă în timpul procesului.
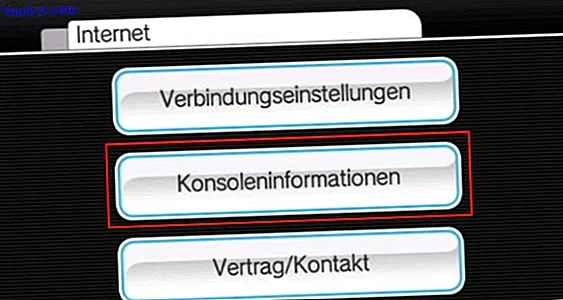
- Porniți Nintendo Wii și găsiți adresa MAC în „Setări sistem”> „Setări Wii 2”> „Internet”> „Informații despre consolă”. Dacă ați găsit adresa MAC pe care o căutați, scrieți-o.
- Introduceți cardul SD în computer. Formatați cardul de memorie în format „FAT16” folosind Windows Explorer sau orice program.
- Descărcați pachetul complet Nintendow Wii 4.3 Letterbomb Homebrew Channel. Selectați „4.3E” în „Versiunea meniului sistem”, introduceți adresa MAC și faceți clic pe „Tăiați firul roșu”.
- De îndată ce ați descărcat pachetul complet, dezarhivați fișierul ZIP direct pe cardul SD în directorul principal (directorul rădăcină). Când copierea este completă, introduceți cardul de memorie în Wii care este oprit și reporniți consola de jocuri.
- Selectați „Wii Wall” în meniul principal al Wii și căutați în istoricul calendarului dvs. o literă roșie cu o bombă pe ea. Selectați această așa-numită „scrisoare bombă” pentru a instala canalul homebrew.
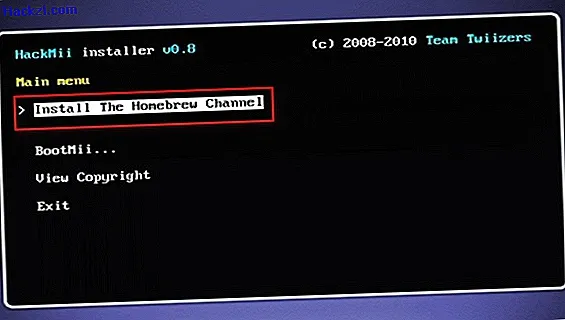
- Confirmați instalatorul cu tasta „A” până când vedeți „Instalarea canalului Homebrew” pe ecran.
- Folosiți tastele săgeată ale controlerului dvs. Wii și selectați opțiunea „Instalați canalul Homebrew”. Consola de jocuri va instala acum canalul. Imediat ce procesul este finalizat, ieșiți din programul de instalare „HackMii” selectând „Reveniți la meniul principal” și apoi „Ieșiți”.
- Vei ajunge imediat în meniul canalului homebrew. Selectați „Ieșire din meniul Start”. Acum Wii va reporni sau veți fi redirecționat către meniul principal.
- În meniul de pornire veți găsi acum un buton pentru canalul homebrew. Selectați instrumentul și apoi apăsați „Start”. Acum sunteți pe propriul canal de homebrew.
Un alt sfat practic vă va arăta cum să transferați datele dvs. de la Nintendo Wii la Wii U într-o manieră simplă.
Ultimele videoclipuri
Puteți găsi adresa MAC la „Informații despre consolă”. Acestea intră apoi pe site-ul „HackMii”.
Decuplați pachetul complet „Nintendo Wii 4.3 Letterbomb Channel” din directorul rădăcină al cardului SD.

Căutați „Letterbomb” din istoricul calendarului pentru a începe procesul de instalare.

Confirmați instalarea canalului homebrew cu opțiunea „Instalare canal Homebrew”.
După ce ați instalat cu succes canalul homebrew, ieșiți din programul de instalare „HackMii” selectând „Ieșire”.
