
iPhone 6S: Schimbare afișare - instrucțiuni de reparație
Dacă ecranul a fost deteriorat de iPhone 6S, îl puteți modifica oricând. Împreună cu experții în reparații de la iDoc vă arată pas cu pas cum să faceți acest lucru.
Pregătire: Instrument și ecran nou pentru iPhone 6S
- Pentru a înlocui afișajul, aveți nevoie atât de un ecran nou, cât și de instrumentul potrivit. Instrumentul include două șurubelnițe speciale, o ventuză și un plectru din plastic.
- Ecranul și instrumentul sunt disponibile de la iDoc. În funcție de model, alegeți unul dintre următoarele seturi de reparații: iPhone 6S negru, iPhone 6S alb, iPhone 6S Plus negru, iPhone 6S Plus alb.
- De asemenea, veți avea nevoie de un uscător cu aer cald sau un uscător de păr obișnuit. Ecranul este lipit și poate fi îndepărtat ușor doar prin căldură.

Pasul 1: Deschideți ecranul iPhone 6S
- Opriți iPhone 6S complet. În caz contrar, poate exista un scurtcircuit în dispozitiv.
- Acum încălziți marginile smartphone-ului cu uscător de păr sau uscător de aer cald. IPhone 6S ar trebui să fie doar cald, nu fierbinte. Păstrați suficientă distanță pentru a evita deteriorarea.
- Scoateți cele două șuruburi din partea de jos a conexiunii de alimentare, așezați ventuza chiar deasupra butonului de acasă și luați plectronul din plastic în mână.
- Glisați plectrul sub butonul de pornire între afișaj și carcasă. Pentru a face acest lucru, trageți ventuza cu o presiune ușoară.
- Acum trageți plectronul de-a lungul marginii smartphone-ului până când ecranul se desprinde. Introduceți plectronul în dispozitiv doar câțiva milimetri.
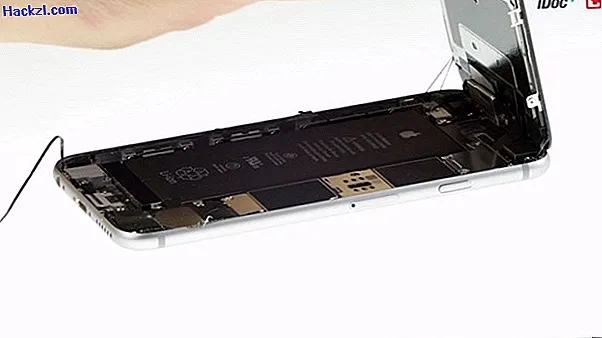
- Dacă afișajul s-a desfăcut în toate punctele, îl puteți deschide în sus. Acolo este încă conectat cu un cablu.
- Pentru a nu deteriora contactele, ar trebui să deschideți afișajul la maximum 90 de grade. Acest lucru este deosebit de important pentru instalarea noului afișaj, astfel încât cablurile să nu fie întinse.
- Sfat: Dacă afișajul este împărțit, ventuza nu poate fi fixată corect în unele cazuri. Pur și simplu lipiți zona afectată peste butonul de acasă cu bandă adezivă.
Pasul 2: scoateți afișajul de pe iPhone 6S
Notă: În următorii pași, trebuie să scoateți mai multe șuruburi diferite de pe iPhone. Puneți acest lucru pe placa magnetică furnizată sau faceți singuri o mică schiță. Sortarea este extrem de importantă, deoarece șuruburile de același tip au uneori lungimi diferite.
- Înainte de a începe cu scoaterea, ar trebui să deconectați, de asemenea, contactele bateriei. Acest lucru asigură că telefonul mobil nu pornește accidental și că există un scurtcircuit. Pentru a face acest lucru, scoateți cele două șuruburi ale conectorului bateriei și scoateți capacul. Puteți îndepărta apoi cu atenție dopul ridicându-l cu o unghie sau cu o șurubelniță subțire.
- În partea dreaptă sus a iPhone 6S veți găsi o placă metalică. Scoateți toate cele patru șuruburi și scoateți capacul.
- Există trei cabluri plate sub capac. Încercați-l cu grijă cu o unealtă din plastic.
- Scoateți ecranul vechi și conectați noul ecran la iPhone. Pur și simplu așezați afișajul pe carcasă.
- Porniți iPhone-ul și testați dacă ecranul funcționează cu adevărat. Dacă toate funcțiile sunt disponibile, puteți opri din nou iPhone 6S.
- Acum eliminați noul afișaj. În ultimii pași, trebuie să preluați unele componente de pe ecranul vechi.
Pasul 3: schimbați afișarea iPhone 6S
Notă: Trebuie să fiți deosebit de atenți atunci când scoateți ultimele piese și apoi introduceți-le în noul afișaj. Aici, mai multe componente sunt lipite suplimentar. Prin urmare, vă recomandăm să utilizați videoclipul de mai sus din minutul 4, pe lângă instrucțiunile scrise.
- Veți găsi o copertă argintie în partea de sus a ecranului vechi. Desfaceți toate cele trei șuruburi acolo. Îndepărtați capacul inclusiv suportul negru mic.
- Îndoiți camera frontală și îndepărtați casca de dedesubt.
- Acum este necesară îngrijire specială. Mai multe alte componente atârnă de camera frontală. Întregul complex este lipit și poate fi îndepărtat cel mai bine cu penseta.
- Placa mare din spatele afișajului este conectată cu un total de 8 șuruburi. Desfaceți toate șuruburile și îndepărtați placa.
- De asemenea, există un capac cu două șuruburi deasupra butonului de pornire. Apoi deconectați conexiunea prin cablu și îndepărtați butonul de pornire.
- Acum toate piesele sunt introduse înapoi în noul afișaj. Îndepărtați toate reziduurile de adeziv și aplicați noul cadru adeziv.
- Apoi conectați afișajul la carcasă și închideți dispozitivul din nou.

În următorul sfat practic, vă vom arăta 11 sfaturi inteligente pentru iPhone 6S.